

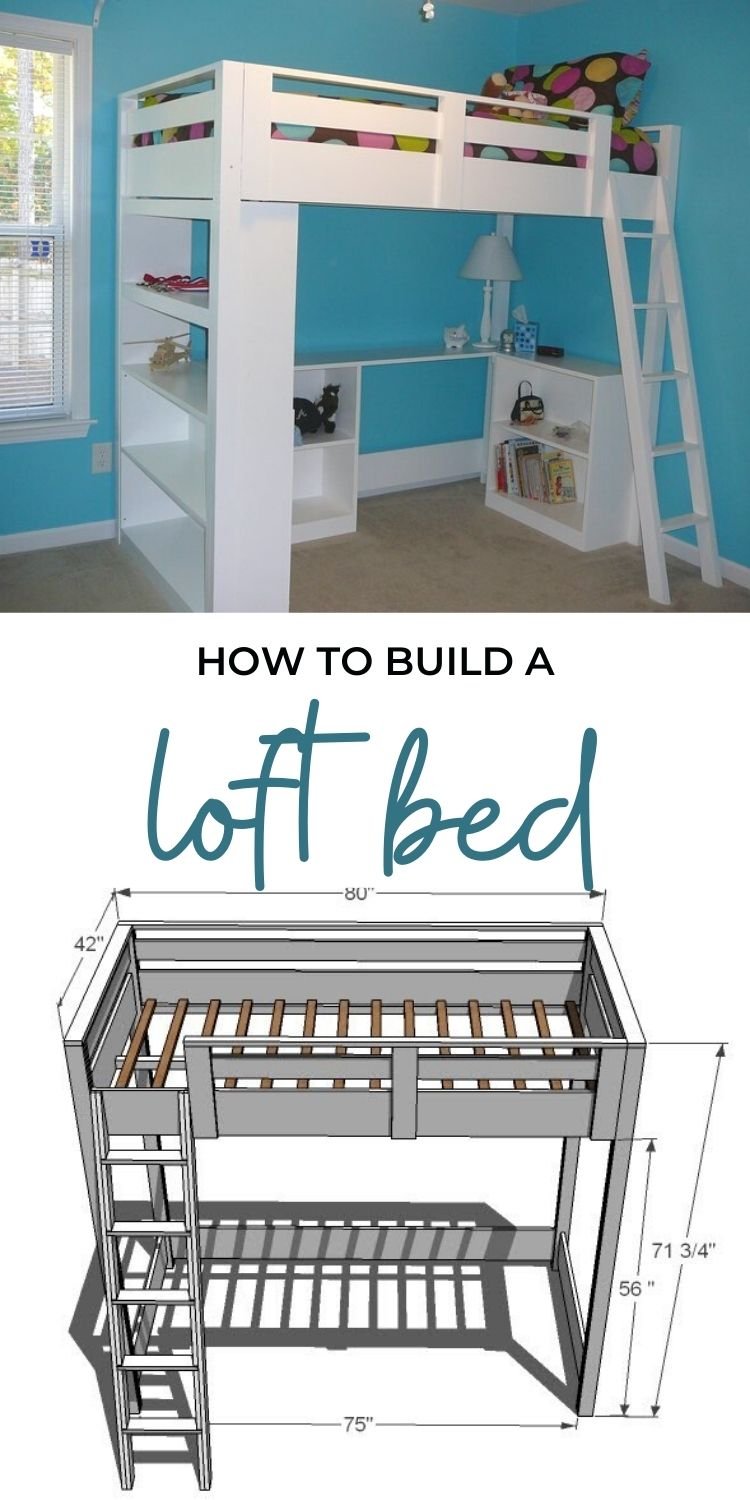
How To Build A Full Size Loft Bed
Difficulty
Intermediate
| 


This plan is but for the loft bed. You tin can customize the storage underneath by calculation a alpine bookcase and a desk organisation. (plans linked)

This plan uses a congenital in slat system equally shown. You can use any type of 3/four" fabric - check your mattress recommendations for slat spacing. I commonly will burn up scrap wood hither.

Pin For Later!
Dimensions
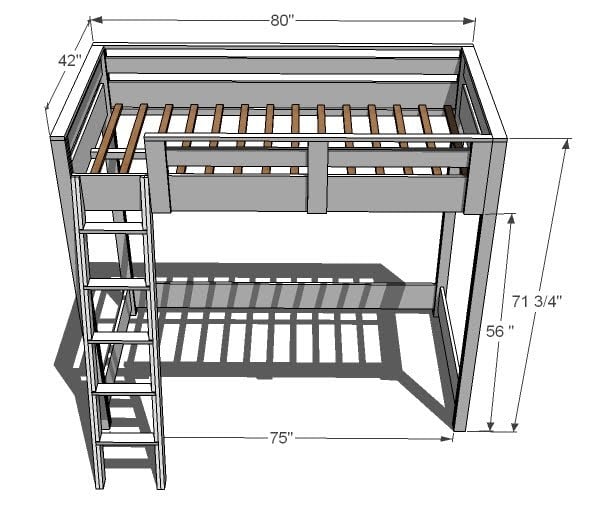
Fits standard Twin Mattress. Dimensions shown in diagram.
Preparation
Shopping Listing
- 15 – i×3 Boards, 8′ Long
- 3 – one×8 Boards, 10′ Long (cut one long and one short cutting from each)
- i – 1×viii 48″ Long (cut ane brusque cut from this ane)
- 3 – ane×4 Boards, viii′ Long
- i – 2×2 Lath, 8′ Long
- 11 – 1×ii Boards (Less if you have a bunkie board or box spring), 8′ Long
- one 1/4″ self borer screws (can likewise use brad nails and glue)
- 2″ self tapping screws
- Wood Glue
- Finishing Supplies (Wood Filler, Sand Paper, Paint, Brushes, etc)
Cut Listing
Cutting List for Loft Bed
- viii – i×3 @ 71″ (Inner Legs and Outer Legs)
- four – i×viii @ 37 1/2″ (Large Planks, Ends)
- ii – one×4 @ 37 1/2″ (Top Planks)
- three – i×8 @ fourscore″ (Forepart and Back Rails)
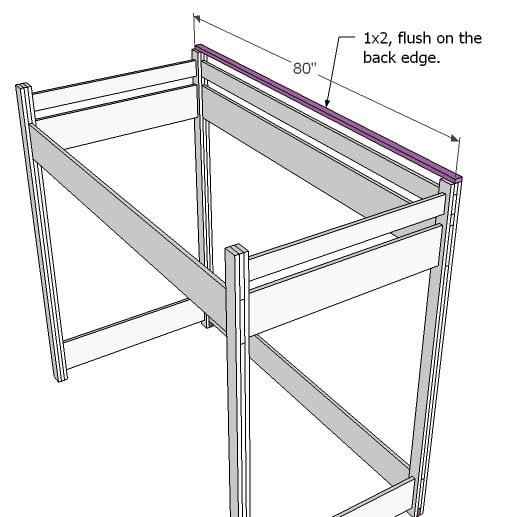
- 1 – 1×four @ lxxx″ (Top Back Rail)
- ii – i×three @ 46 1/2″ (Dorsum Filler Piece, Long)
- vi – 1×three @ 2″ (Dorsum Filler Piece, Short)
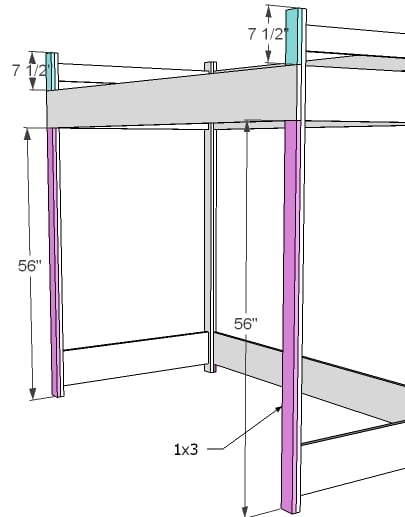
- 2 – i×three @ 56″ (Front end Filler Pieces, Long)
- 2 – one×3 @ 7 1/2″ (Front Filler Pieces, Short)
- 1 – 1×2 @ 80″ (Dorsum, Acme Piece)
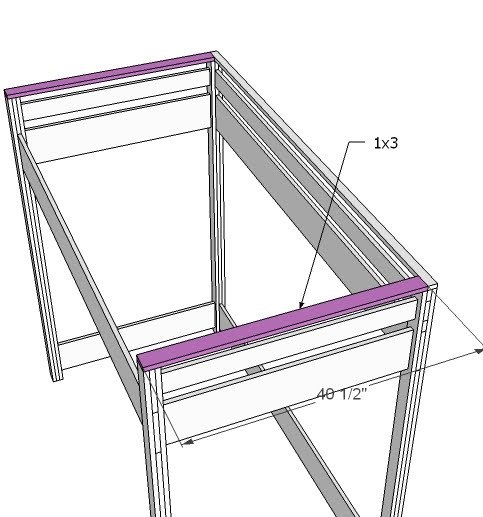
- two – 1×iii @ xl 1/two″ (End, Meridian Pieces)
- 2 – 1×two @ 75″ (Cleats)
- 1 – 2×2 @ 76 3/4″ (Center Back up)
- xiv – one×two @ 39″ (Slats)
Cut List for Baby-sit Rails
- ane – ane×4 @ 61" (Rail)
- ane – 1×2 @ 61" (Top)
- 3 – 1×4 @ xv" (Uprights)
- 6 – 1×4 @ ii" (Filler Pieces)
Ladder Cut List
- 2 – 1×iii @ 65 three/4″ Overall (Bottom cease cut at xv degrees off foursquare, tiptop at 75 degrees off square)
- 10 – one×3 @ 10 iii/eight″ (Spacers, ends cut parallel at 15 degrees off square)
- 5 – 1×3 @ 12 1/2″ (Treads)
- 2 – ane×three @ ten″ (Top Spacer, cut to match top sides)
Cutting Instructions
Converting to Full Size This bed can easily be converted to full size. You will just need to add 15″ to all boards that run parallel to the ends. This includes the planks, stop meridian pieces and the slats. Shopping list volition need to be adapted as well.

General Instructions
On a large project such as this 1, it is crucial that you lot build straight and foursquare. To do this begin by working on a clean level surface. Select boards that are straight and complimentary of cracks or other imperfections. Cheque for square after each pace. Predrill and countersink all of your screw holes to avoid splitting the forest and to hide your screw heads. Employ gum unless otherwise directed. Of course, you should exist safe and have fun! Remember, you can click images for larger views.
Instructions
Step 1

UPDATE: If you have narrow door opening (or are building the bed in a full size) you may need to assemble the bed in the room or not use mucilage so that the bed tin be assembled and disassembled. The boards shown above in pinkish are not to be glued to the bed, and will exist inserted in the slots on associates. You lot will then on assembly use screws to spike the rail to the bed ends.
Pace two

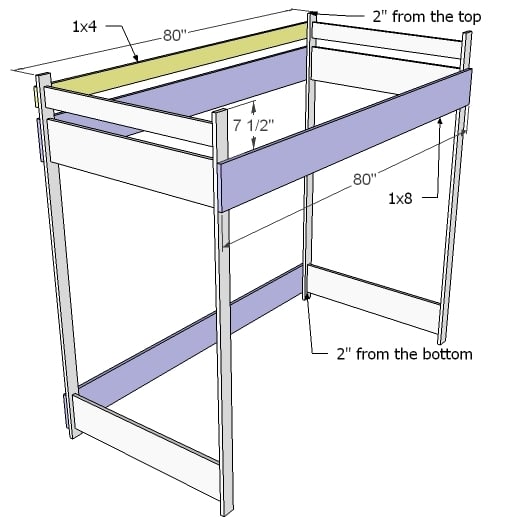
Ends Brainstorm building the ends by screwing with 2″ screws and gum the planks to the inside legs. Center the planks on the inside legs, leaving seven/8″ on either side of the planks. Use the measurements above to guide you. Glue these pieces.
Stride three
Front and Back Rails Instead of fastening the front and dorsum rails, mark their positions on the ends, as shown above. Yous tin can use one or two screws to fasten each lath in identify temporarily.
Step 4
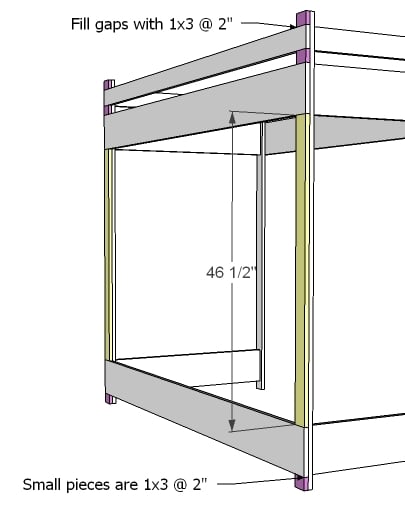
Dorsum Filler Pieces Measure and cut your filler pieces to fit the back as shown higher up. You tin can save yourself quite a bit of time by gluing and clamping these pieces in identify. When you lot spike the outer leg on, it will secure these pieces with screws. If your nailer is handy, a few 1 i/four″ nails would concord everything in place. You can utilize glue in this step. The filler pieces will hold your track boards (the one's you did non mucilage down in stride 2) in place for now.
Step five
Step 6
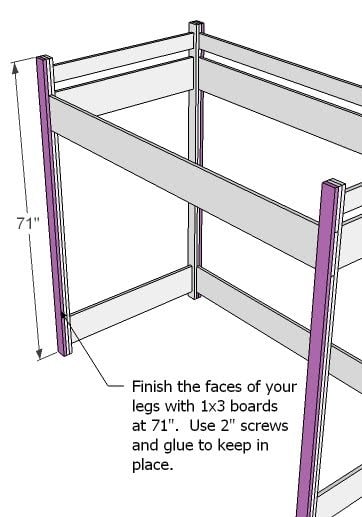
Outer Legs Pieces First unscrew the rail boards that y'all loosely screwed in stride two, and remove. And then, using 2″ screws and glue, predrill and countersink your screws as you spike the outer leg boards to the inner leg boards. If yous are staining or leaving natural, I highly recommend using a measured bolt design or screwing from the inside of the legs on this step.
Stride 7
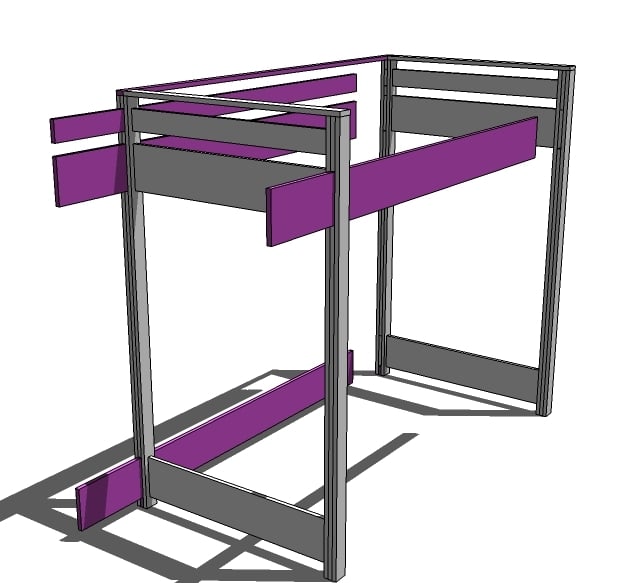
Practice NOT FASTEN in the gaps left for the track boards. Test fit your runway boards to brand sure they fit in the opening. The diagram above shows how the rails boards should be removable.
Step 8
Back, Summit Using 2″ screws, fasten the back top piece to the tops of the legs. The back summit slice will be flush with the outside of the legs, but not the inside. Exercise not apply gum. This board will be removed to move the bed through a doorway.
Step 9
Top, Ends Using 2″ screws and glue, fasten the pinnacle end piece to the top of the ends, as shown above.
Step 10
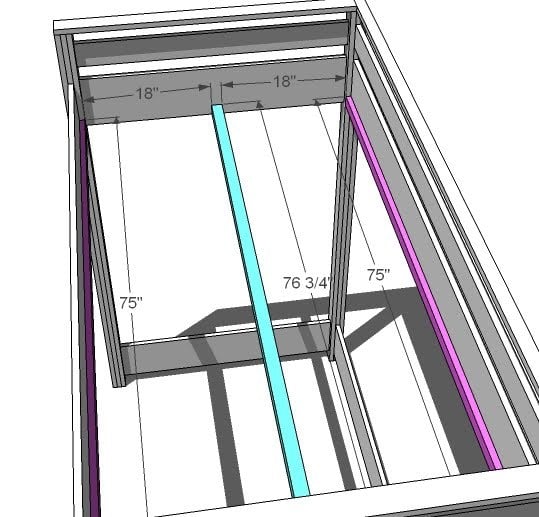
Cleats On assembly, fasten your side cleats to the side rails, flush with the bottom edge. Use i 1/4″ screws. And then fasten your center cleat to the finish planks, flush with the bottom of the ane×8 plank, using 2″ screws and NO glue. Middle the back up on the plank.
Pace 11
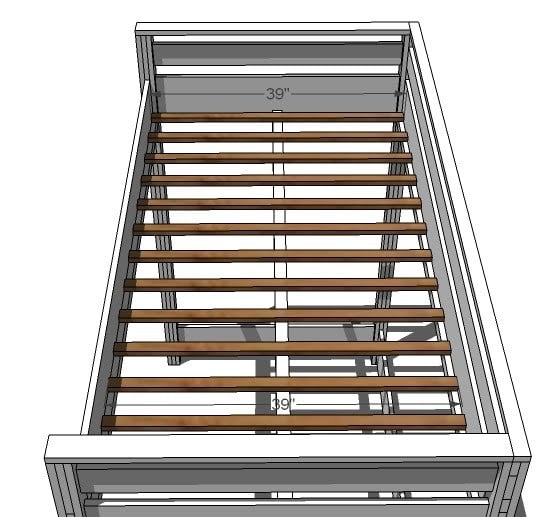
Slats Position your slats with approximately 4″ gap between the slats. TIP: Cut two 1×2 scraps at 4″ and uses as a spacer betwixt the slats as you are assembling. Screw the slats down with ane 1/4″ screws. For extra support, you tin can also spiral a couple of the centre slats from the outsides of the 1×eight rails using ii″ screws.
Step 12
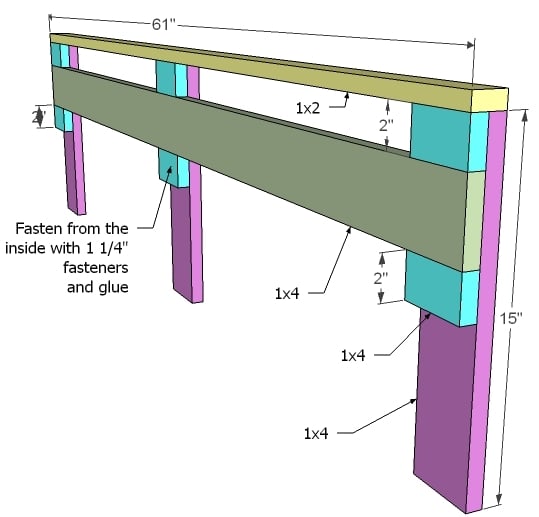
Guardrail Utilize i i/iv″ fasteners (nails would piece of work just fine) to build your guardrail. Fasten from the inside to hide holes. And then add the 1×ii top, keeping all outside edges flush.
Stride 13

Guardrail Attachment Adhere the guardrail to the bed every bit shown above. From the inside, use 1 1/4″ screws. Don't use mucilage then you lot tin can remove it.
Pace fourteen
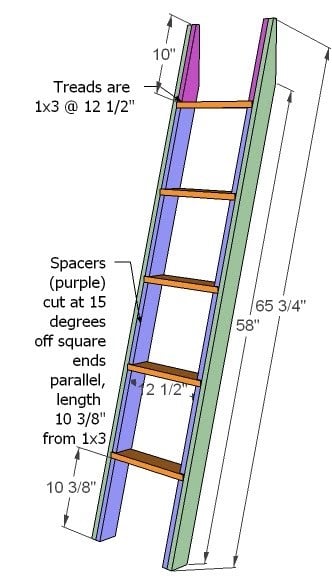
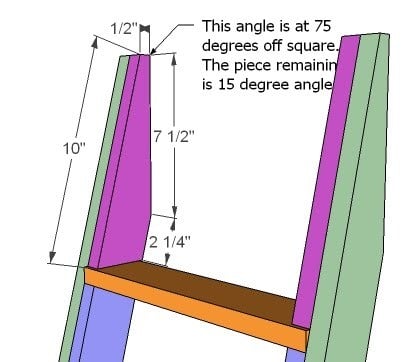
Ladder So cutting the top of the sides is going to be a lilliputian tricky. Call up of it this way, y'all are leaving a 15 degree angle on the top of the board, then trimming off the meridian 2 ane/4″ to remove the precipitous pointy terminate. The best fashion to do this is FIRST cut your tiptop angle at 75 degrees off foursquare (leaving fifteen degees on the board). You will need to utilise a jigsaw or circular saw. So snip off the top 2 one/4″ at a right angle (ninety degrees) from the back of the top (where the leg rests against the bed. THEN mensurate downwards the leg 65 iii/4″ and cut your 15 degree bending on the bottom of the leg. Then use the acme as a pattern when cutting the top filler pieces. Construct your ladder equally shown in a higher place, using 1 i/4″ screws when joining the filler pieces to the leg sides, and two″ screws to join the treads to the leg sides. Don't forget your glue. Come across an exploded view below.
Step xv
Footstep sixteen
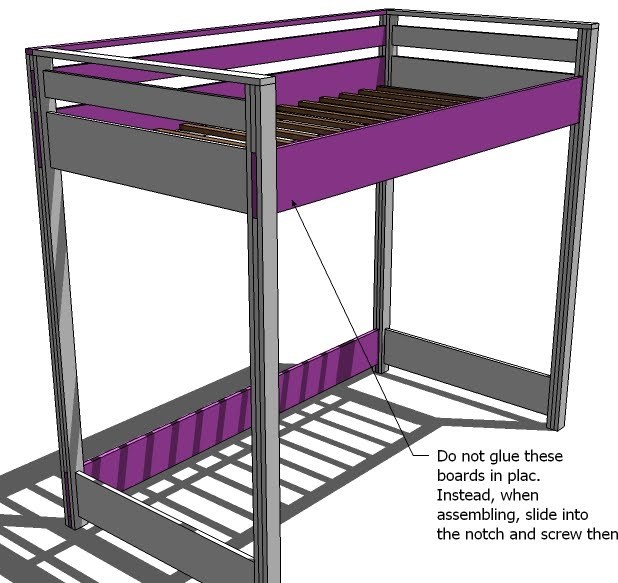
Assembly The boards shown in pink higher up are removable and are non glued down. Y'all should be able to slide the boards out of the notches to disassemble the bed and move. Slide the boards back into the notches to assemble and use ii″ screws to screw from the exterior of the leg into the rail boards. Also screw the back height to the peak as show above. In this method, you should exist able to hands gather and disassemble the bed without destroying the finish.

How To Build A Full Size Loft Bed,
Source: https://www.ana-white.com/woodworking-projects/how-build-loft-bed
Posted by: sumrallcalim1942.blogspot.com
0 Response to "How To Build A Full Size Loft Bed"
Post a Comment